Showing posts with label Battle Nations. Show all posts

Wednesday, April 4, 2012

Battle Nations - PvP Part 2

I previously posted about the free rewards you can get in PvP.  Even though you get VP when you lose, it can be frustrating at first if you always lose.  One way to improve your odds of winning, is to have the best and strongest units available at your level.  PvP matchmaking always restricts you to opponents of your own level, so you are (in general) guaranteed that nobody has access to better units than you do.  Here are my recommended loadouts by level:

Levels 1-3: Troopers are the only units available.  Doesn't really matter how you line them up, but it's good practice to spread them out.  You will only be facing other Troopers, except for the odd person that's spending nanopods on Shock Troops.  Strategically speaking,remember that it takes two shots from a Trooper to kill another Trooper and that each Trooper requires 1 turn to reload.  That means you should choose your targets to time your kills most effectively.  This is especially important when it comes down to 3 or fewer opponent targets.  It's a good idea to put one shot into each opposing unit, and then choose your kills to minimize the damage your opponent can do to you.  For example, with 2 opponent Troopers left and one shot each on them, kill the Trooper that didn't shoot at you last.  The one that shot at you has to reload on the next turn so isn't a threat.  You'll be able to kill both Troopers without taking any damage.

Levels 4-6: Use three Grenadiers in your first row.  It takes 3 shots from a Trooper to kill them, so they make good meat shields.  I find Mortars to be useless.


Levels 7-11: Use three Hunters in your first row.  Like Grenadiers, it takes 3 shots from a Trooper to kill them.  Unlike Grenadiers, they are very effective against other infantry like Troopers, Grenadiers and Hunters.  I find Gunners to be useless given their restricted targeting range.  Most players space their troops out, which greatly reduces the damage that Gunners can inflict.  Dragoons are special units that nobody uses consistently.


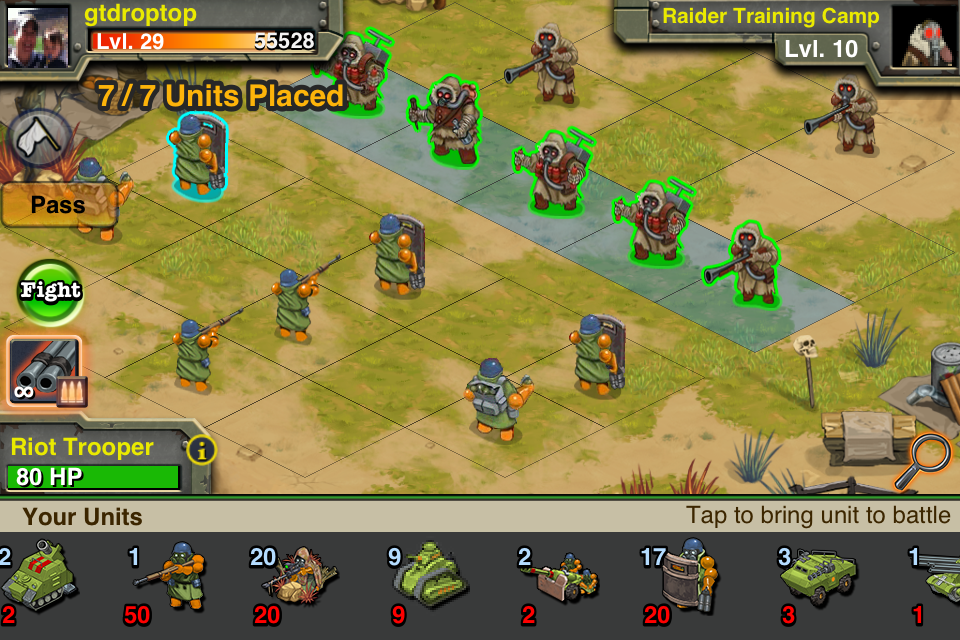
Levels 12-17: Use Riot Troopers in your first row.  Have at least 2 Grenadiers in your second row to deal with opposing Riot Troopers.  Use a Hunter or Trooper in the second row, and a single Trooper in the third row.  Having a Trooper in the third row is especially useful as many of these PvP battles result in one player running out of ammo.  Troopers are nice in that they have infinite ammo.


** Special note: Depending on how you progress through the campaign, you will unlock Sharp Shooters after you complete "A Terrible Boar - Part 5".  Sharp Shooters are the strongest units early on and provide a significant competitive advantage.  It is worth putting other things on  hold to complete the Boar missions and unlock Sharp Shooters.  Once you have them, replace the Hunters and Troopers above with Sharp Shooters.


With the new levels released, almost everybody has a Battle Raptor now.  These wreck shop and are good to have in your second row.  If you have Riot Troopers available, but run out of good units to go behind them, use a Battle Raptor and your Recon for one match.


Levels 18-23: Use Riot Troopers in your first row, Mini-Tanks in your second row, and Sharp Shooters in your third row.  Mini-Tanks are the best anti-Riot and anti-Tank units for a long time.  Build lots.


Levels 24-28: Use Riot Troopers in your first row, Mini-Tanks in your second row, and Snipers in your third row.  Snipers wreck shop.  Once you hit level 24, stop everything that you're doing and stockpile Snipers.  Find a friend who has Spec Ops that will let you occupy it.  It takes 40 Bars to build Spec Ops, and 5 Bars each per Sniper.  You need 4 snipers at a minimum.  10 is a good number.  You can't have too many.
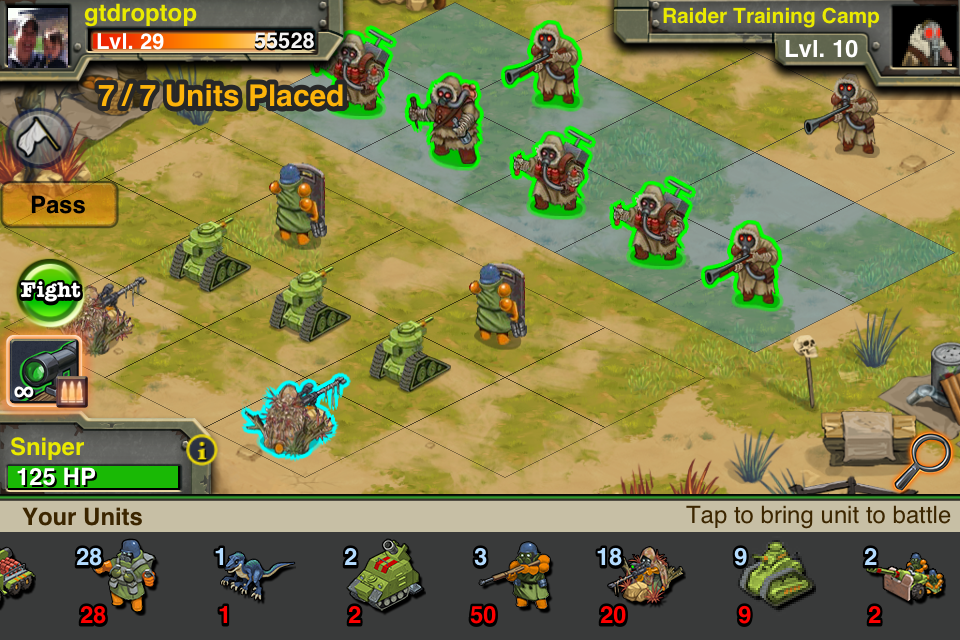

Level 29: Use Tank Killers in your first row, Lt Tanks in your second row, and Snipers in your third row.  You can also substitute Gun Trucks or Bazookas for Tank Killers in your front row.  Most players will have one-shot armor killers in their loadouts here, so everything in your front row is sacrificial.  Snipers are decent at taking out the armor killers and don't deflect as often as Tank rounds.  Prioritize the opponent units that can do heavy damage to you.  Snipers will kill Gun Trucks in one shot, and can kill Bazookas with one critical shot.  Remember that Gun Trucks and Tank Killers only have one ammo, and Bazookas only have two.  Once they've spent their ammo, they can be ignored, as they are no longer a threat.
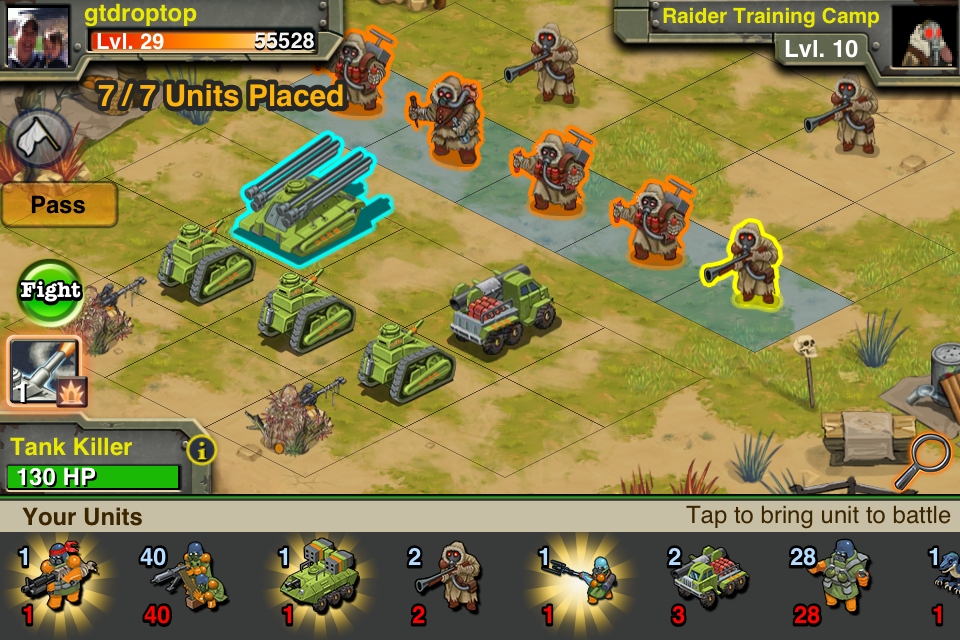

Level 30+: I'm not there yet.  But by now, you should have figured this out yourself.

Wednesday, March 14, 2012

Battle Nations - Housing Part 2

I previously posted stats about how much gold different types of housing produce, noting that Shelters are the most cost efficient units.  While this continues to be true, it does require that you check back regularly to collect your gold.  I've done some more modeling, taking into account how many times a day you might actually open the game to collect gold.  Shelters continue to be the best option if you are able to check it 2-3 times an hour (28-48 times a day, not counting sleeping time).  However, you can see that if you're not playing as obsessively as I might be, other housing units might be better suited for your playing style.


Hovels are a good option for those playing 5-15 times per day (every 1-4 hours).  They produce 75 gold every 4 hours, and house 5 workers, at a cost of only 800 Gold.  I have since diversified my housing investment to include both Shelters, Camps and Hovels.  Shelters and Camps continue to be the most flexible housing units, allowing you to tear them down and put them up quickly at almost no cost, while still hitting your max population cap exactly.

Friday, March 9, 2012

Battle Nations - Population Part 2

Somebody left a comment asking:

"population limit of 150 reached.
Level up to build more house. "
Do you know what that message means?
Build a house there "Housing"> "Bunkhouse" or "Compound", etc.

Yes, I know what this means.  It means you are lvl 24 and are limited to having 150 people in your Outpost.  You usually get this message when you're trying to build a Housing structure that would put you over that limit.  A Compound houses 10 and a Bunkhouse houses 8, so if you got this message while clicking one of those units, then you probably have between 143 and 150 population in your Outpost, and one of those units would put you over 150.  You can either pick a smaller housing unit like a Shelter (3 pop) or Camp (4 pop), or wait until you level up.  You get 5 extra pop for every level at 18 and higher.

Current clan players: gtdroptop, unsavory, omniscientDeath, beer4porter, fishbone10

Thursday, March 8, 2012

Battle Nations - Roads

You'll notice that there is a "Decoration" category in Battle Nations with stuff to make your outpost look pretty.  Some of these are functional.  Roads, specifically:

  • Dirt Roads
    • Cost: 6,500 gold, 100 stone, 0 seconds
    • Return: +1% XP to agriculture, max of +5%
  • Cobblestone Road
    • Cost: 1 nanopod, 0 seconds
    • Return: +2% XP to housing, max of +10%
  • Blacktop Road:
    • Cost: 28,000 gold, 250 concrete, 100 oil, 0 seconds
    • Return: +2% XP to shops, max of +10%
The simple ROI is easy.  What's REALLY cool about roads though, is that they can increase Hauler efficiency at your Resources Depots.  Note here in the picture that I've just placed two Dirt Roads in the path of my Hauler, and efficiency increased so much that I only need 1 Hauler for two resources (Stone and Iron).

Wednesday, March 7, 2012

Battle Nations - Goods

If you've been paying attention to the blog and read the housing post, then you've torn down all your expensive housing and replaced it with Shelters only.  As a result, you're always rolling in gold and are never gold limited.  In that case, the only reason to build any goods (aside from when the campaign requires it) is to gain XP so that you can level up.  Not all goods are created equal.  Here's a table of all the goods you can produce at the earlier levels of the game and what you can earn, sorted by XP per hour per person:

Note that Quinoa from fields is one of the best values out there.  Technically, Cabbage is king, but you have to harvest it every 5 minutes to make it worthwhile.  You'll also notice that Bakery and Tool Shop items are largely worthless.

Artichokes provide a really nice option to grow because Farms only take 60 gold and 5 seconds to build.  I will typically just put all my extra works into Farms to grow Artichokes, and may even tear down my Bakery and Tool Shop when I am worker-constrained.

Monday, March 5, 2012

Battle Nations - PvP

Clan critical mass is now at 5 players for Battle Nations.  Why aren't you playing yet?

UnsavorySamurai gave me a tip to check out PvP.  If you choose the PvP icon in your bottom control panel, it will take you to the "Fight Other Players" screen where you can do live head to head battles against random players that match your lvl.  There's three huge advantages to this game mode:

  1. It's absolutely free.  None of your casualties need to be healed in the hospital, so there's no concern about losing expensive units.
  2. There's huge rewards.  You earn 1 VP (Victory Point) for each loss and 4 VPs for each win.  The game gives you rewards for every 10 VPs until 40 VPs every 24 hours.
  3. Fast return time.  It only takes 2 hours to return armies from PvP, so you get them back pretty quickly.
In my first couple days playing PvP, these are the rewards that I've gotten at lvl 24:
  • 10 VP: 1,600 gold
  • 20 VP : 5,000 gold
  • 30 VP: 10,000 XP
  • 40 VP: 4 - 6 gears
It's actually better if you start playing PvP at lower levels, because the game will only match you with players of the same lvl.  At lower levels, you can go into battle with armies of just basic Troopers and be able to win with just some smart strategy.  Assuming you win half the time, it only takes 16 quick battles to hit 40 VP each day, and it gives you something interesting to do while you're waiting for resources to pile up or jobs to finish construction.

Friday, March 2, 2012

Battle Nations - Population

If you touch the number on the bottom right of your screen, it will bring up the Demand window.  Demand isn't all that interesting, but this does show your population details:


There are three items to make note of:
  • Max: This is the maximum population allowed for your current level.  It will typically move up by 5 or so people per level.
  • Housed: This is the number of people that fit in the housing that you have built.  If this number doesn't match the Max number, then you are leaving resources on the table.  As previously discussed, Shelters house 3 and Tents house 4, both only take 5 seconds to build.  Between those two, you should always be able to come up with a cheap and quickly constructed combination of Max Pop.  The game will not allow you even start building a House that would take you over Max Pop, so you should try to hit it exactly.
  • Working: This is the number of people you are actually putting to work.  If you have 3 or more people Housed that are not Working, you are leaving Gold and XP on the table.  Build a Farm and put them to work.
  • Resource Depots: I put this here because I notice many people put too many population in their Resource Depots.  Your depot will max out at 100%.  The game will allow you to assign more Haulers, but it won't increase your collection rate past 100%, so there's no point.  It's just a waste of Pop.

Thursday, March 1, 2012

Battle Nations - Raiding Basics

The #1 benefit I've found of having friends on Battle Nations is being able to mine each other's resources.  Within your own Outpost, you can only mine resources on land that you've expanded into.  However, your friends can mine resources from anywhere in your Outpost, even land that you don't own yet.  Better still, it doesn't cost you anything if you do it right!  Some key items:

  • Defenses: Take down (sell) all your defenses!  The campaign will make you build pillboxes, bunkers, cannon towers, etc, but they don't serve any real purpose.  Defenses do not defend against A.I. Raiders, they just make it more expensive for your friends to raid you (not nice).  If you are going after undefended resources, it only takes two basic Troopers to Raid/Occupy.  No point in sending more expensive units and having them tied up on the road.
  • Battle Flag:You have to raise your Battle Flag in order to raid or be raided by friends.  Don't worry, only your friends can raid you, so you won't have a ton of strangers in your land all of a sudden.
  • Attack: You'll typically only choose this against the A.I., or if you want to mess with your friend.  If you're being nice, don't ever choose Attack for your friends.
  • Raid: This allows you "steal" resources from your friend, including from buildings and mines that they've built.  You will receive resources when you win, and it doesn't cost them anything.  No resources are actually taken from your friend's perspective, and any damage you inflict doesn't actually cost them anything.  You can return armies from Raiding much faster and re-raid.  You can typically raid a resource every 4 hours, but you can raid several different resources and stagger it.  As an example, unmined iron will net you 10 iron every 4 hours from raiding.
  • Occupy: This allows you to park your army on your friend's resources, and you can regularly go back to collect those resources.  The game will even notify you when they're ready to be collected.  This DOES affect your friend if you Occupy something that they are actively using and can result in a 10x time penalty.  It's best to Occupy resources that they don't have access to yet.  Unmined iron will net you 38 iron every 4 hours from occupying.
  • Counter-Attack: After your friend raids your outpost, their armies are available on the boundaries of your territory to counter attack as they withdraw.  If you are trading resources, you should NOT counter attack because it results in actual losses to your friend that they then have to go spend gold and iron to heal.
  • Collect: After you raid your friend, be sure to go into your Army management window to collect your guys.  Otherwise they'll get lost in no-man's land forever.
The Battle Nations folks have posted a decent tutorial on how to manage your armies: http://battlenations.com/forums/topic/walkthrough-army-management/

Wednesday, February 29, 2012

Battle Nations Housing

In Battle Nations, you can build several types of Housing.  This is important to increase your population so that you have people to work in your other construction.  You can also collect taxes from your Housing.  You will be asked to build Shelter, Camp, Hovel and Bunkhouse housing as part of the campaign, but you can tear them all down after the mission and build whatever you like.  Note that the tax rate for each type of housing varies widely:


You'll notice that Shelters have the highest gold return per person per hour.  The per person metric is important because you will always be lvl limited for population, i.e., the game will limit how much population you can have based on your current level.  For example, a Hovel generates 75 gold every 4 hours, but a Shelter will generate up to 240 gold every 4 hours.  Even if you only check your Shelter twice an hour, you'll still get 120 gold over 4 hours.  Three Hovels costs 2,400 gold and 3 hours to build, is 15 population and generates 225 gold every 4 hours.  Five Shelters costs 250 gold and 25 seconds to build, is also 15 population and generates 600-1,200 gold over 4 hours.

Monday, February 27, 2012

Battle Nations Basics

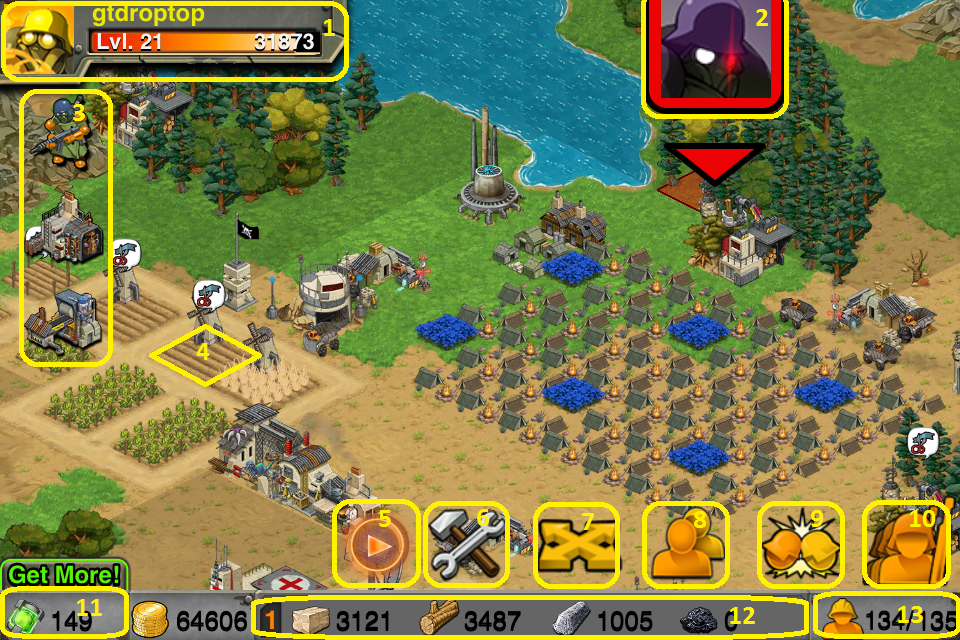
There's at least two clan members playing Battle Nations now, so I'm not motivated to start posting about it.  The tutorial missions are decent at getting you started, but there's no instructions, so there's a few things you might miss.  The Battle Nations Wiki is a great resource, but here's a primer on some of the basic controls:
  1. User Info: This is where you pick up messages, change your icon and other settings
  2. Enemies: Raiders and players in your Outpost show up like this.  Touch the player icon and a dialog box will slide out to the right with the option to Attack.  Touch Attack to engage in battle.
    • NOTE: You can always Retreat from a battle for free, doesn't cost you anything.  For example, you can select Attack to see what units are there, and then Retreat if you don't think you can beat them.
  3. Missions: Each of these icons represents an active campaign mission that you can go do.  Touch them to see what you need to do next.
  4. Active tile: In general, you should always touch the ground tile that you want to use instead of the activity icon above it.  For example, if you want to activate the Field in this screenshot, you should touch where the "4" is, and NOT where the scissor-icon is.  This is true for construction as well as for units in battle.
  5. Minimize: Touch here to minimize the controls at the bottom of the screen
  6. Construction: Touch here to access all the things you can build
  7. Move: Touch here to enter the Move interface where you can move anything you've built, rotate tiles, and delete (sell) items.
    • It's always free to move anything, and you can move things even while they're being built
    • You can delete trees.  As far as I can tell, they don't serve any purpose and just take up space.
  8. Friends: Touch here to see your friends or campaign characters.  This is how you go to visit other lands.
  9. PvP: Touch here to engage in player-vs-player matchmaking.  Will put you into battle with random players of the same level as yourself.  I don't really know how this works yet.
  10. Armies: Touch here to see all the units you have, garrisons that are in bunkers, or armies in other lands.  Remember that if you Raid or Occupy a friend's Outpost, you'll need to retrieve your armies here when they're done.  It takes some time for them to return.  If you don't claim them here, they'll be unavailable until you do.
  11. Nanopods: These cost real money and are extremely valuable, I recommend you don't spend them until the campaign requires them.  There's a campaign mission that requires 75 nanopods.  The easiest free method to get nanopods is by using tapjoy.com.  Access it from your iDevice and follow the directions.
  12. Resources: Touch here to cycle through all your resources and how much you have of each.
  13. Demand: Touch here to see what your workers want.  Doesn't really come into play all that often, it's more useful to look for the blue arrows when choosing what goods to make.

Wednesday, February 22, 2012

Battle Nations

I've started playing Battle Nations for iOS and am deeply addicted.  I need friends to play with.  Join me.  It's free.

In Battle Nations, you take command of the elite Imperial Army as you expand and secure the empire. Gather precious resources and build a thriving nation to power your machine of war. Train your troops and battle the attacking rebel forces for dominance of the land.

Battle Nations Features Include:
  • Robust Story Driven Campaign: Join the ranks of the Imperial Army and fight your way through over 130 missions
  • Strategic turn-based combat: Command dozens of unique troops and vehicles in battle
  • Real-time PvP Battles: Queue up and battle other Battle Nations players from around the world for prizes
  • PvP Invasions: Fight with Friends and invade their empire or help a friend in need and repel an attack
  • Base Construction: Build a network of structures to support and protect your empire
  • Resource Management: Find, gather and refine precious resources to fuel your army